Affordable eSIM solves data communication issues when traveling abroad!

How to use the low-cost eSIM
“airalo" eSIM for overseas travel
eSIM is a great help when traveling abroad
Nowadays, smartphones and mobile phones are indispensable even when traveling.
I’ve used my smartphone 📱 or cell phone overseas with “data roaming" turned on (mobile data communication enabled) and been surprised by the high bill when I returned home.
I didn’t want that to happen so I could only use the hotel Wi-Fi when I was traveling, or I went to the trouble of renting Wi-Fi for overseas travel, or I took the trouble of replacing it with a cheap SIM card I bought locally after arriving at my destination.
Each of these methods came with its own set of hassles.
This time, I was freed from all that inconvenience.
Even though this was my first time using an eSIM, it only took me about 10 to 15 minutes to download the app and activate it (to make the eSIM ready for use), even if I took my time to make sure I didn’t make any mistakes.
↑Click to open/close
Is Your Phone eSIM-Compatible?
There are two things to keep in mind before purchasing an eSIM:
- Your device must be eSIM-compatible.
- Your device must be carrier-unlocked.
How To Check if Your Phone Is eSIM-Compatible
There are a couple of quick ways to determine if your device supports eSIM technology:
- Do a quick Google search to see if your phone has an eSIM.
- Review list of eSIM-compatible devices.
(Please keep in mind that certain restrictions may apply depending on your country, carrier, or mobile service.)
A third option is to dive into your phone’s settings to find your IMEI (International Mobile Equipment Identity).
This code identifies your device and the carrier connections you can access.
Head to your phone settings and select “IMEI" under the Network or Connections tab.
Once there, look for the terms “embedded," “digital," “eSIM," or “embedded SIM card".
If you see any of those terms, you can switch to eSIM.
How To Check if Your Phone Is Unlocked
If you purchased your phone outright, it’s probably unlocked.
This may be a new phone you bought at full price or a refurbished/used phone that isn’t locked into a carrier’s plan.
Because an unlocked phone isn’t tied to a contract, you can use whatever carrier package you like.
A locked phone is “locked" into a contract with a service provider.
They charge you $0 for the device, and in return, you agree to use their services for a set period (two years is standard).
There are a few ways to get out of a locked phone contract, but these methods will depend on your provider:
- Buy out the term remaining on your phone (paying the difference due on the contract).
- End the renewal of a locked plan (this will depend on your agreement).
- Ask your provider if they will allow you to defer or switch plans.
How to use airalo

I used the Wi-Fi at a local hotel for all the steps, but it’s best to complete the “Buy an eSim" step before leaving your home country.
1. At first, download the app
Scan the QR code with your mobile phone, or if you are viewing on your mobile phone, you can download “airalo" from the Airalo website, or from the App Store or Google Play.

2. New Registration
■ On Airalo website:
- Go to the Airalo website.
- Click on Log in/Sign up in the top right corner.
- To sign up with Facebook or Google or Apple ID, click on Apple, Facebook, or Google icons at the bottom.
To sign up by Email, enter your details in the form and click on the Sign-up. - The activation Code will be sent to your email.
- Enter the Activation Code and select Continue.
■ On Airalo app:
- Open the Airalo app.
- Tap on Profile in the bottom menu.
- Tap on Log in/Sign up.
- To sign up with Facebook or Google or Apple ID, click on Apple, Facebook, or Google icons at the bottom.
To sign up by Email, enter your details in the form and click on the Sign-up. - The activation Code will be sent to your email.
- Enter the Activation Code and select Continue.
3. Buy an eSim
Please log in.
In the store, select Malaysia from the “eSIM for each country" section (it’s quite far down) and purchase the plan that suits you.
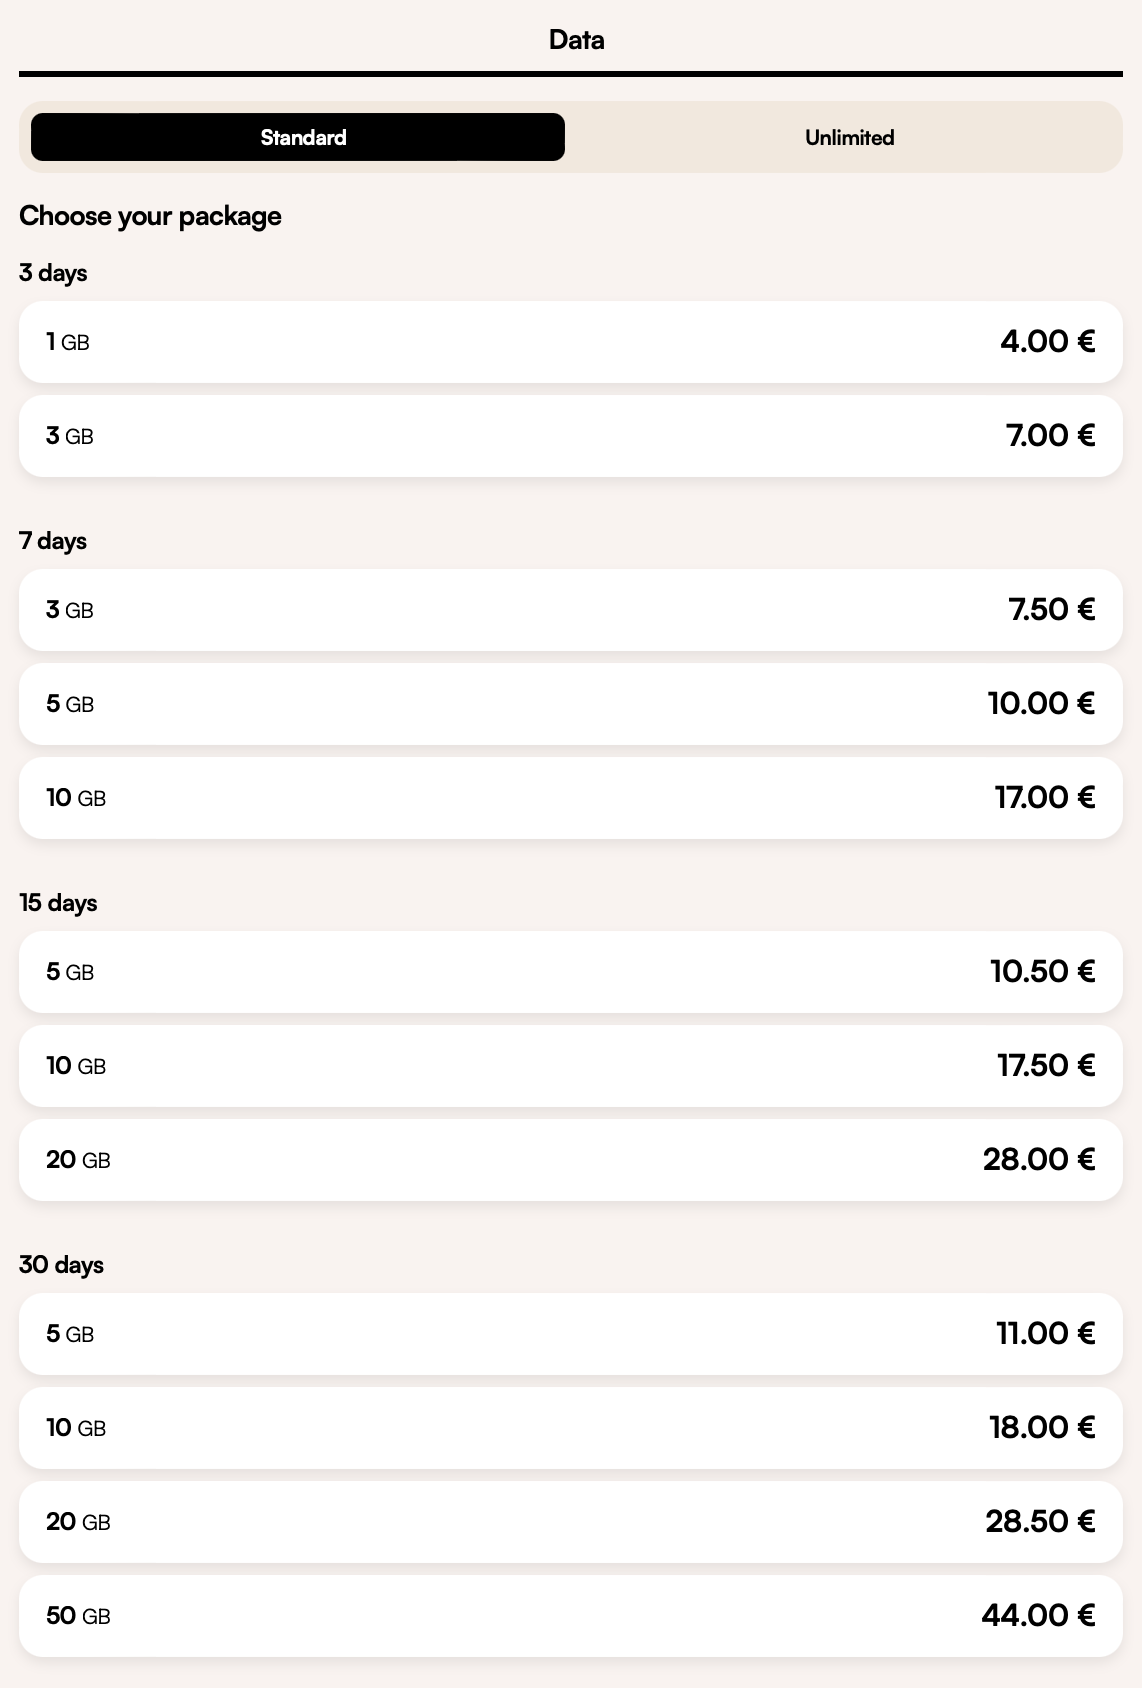

*If you are traveling to multiple countries, choice a “Asia" or “Global".
If your trip is only to Malaysia and is less than 7 days, I think “3GB 7 days € 7.50 (USD 8.00)" is sufficient.
Since my trip was for 10 days, I purchased the “2GB 15-day USD 8.00"*old plan.
I got a $3.00 discount by using a friend referral coupon code (I’ll explain that later).
When watching content that consumes large amounts of data, such as videos on YouTube and other social media platforms, or online games, please do so in a location with a Wi-Fi connection.
Other than that, I used such as WhatsApp calls, including video calls when I was out and about, the Google Maps navigation function, sending my location information to friends in the other area, etc. without any worries, and I ended up with over 1GB left over.
⬇
“Select payment method" and “Apply coupon code"
You can choose from the following payment methods:
Credit and debit cards (VISA, Mastercard and American Express, and UnionPay)
Paypal
Airmoney (Airalo reward currency)
Apple Pay (not available to all countries)
Google Pay
Alipay (only via the mobile app)
You can also combine a payment method with Airmoney by simply choosing the desired payment method, and selecting “Apply Code/ Use Airmoney" to enter the Airmoney amount you wish to use.
Use coupon code for discount
Anyone can apply the coupon code to their first purchase.
The discount price seems to vary depending on the plan.
Apply Code (Coupon code) : TSUKAS3791
First-time buyers get a discount, and referrers also receive a small amount of Airmoney, so it’s a win²♬
⬇
The total amount after applying the coupon code will be displayed in the “Total Amount" field.
If everything is ok, agree to the terms and conditions and tap “Complete order."
Your eSIM purchase is now complete.
Next, you’ll need to install the eSIM on your phone.
It is best to activate the device after arriving at the destination.
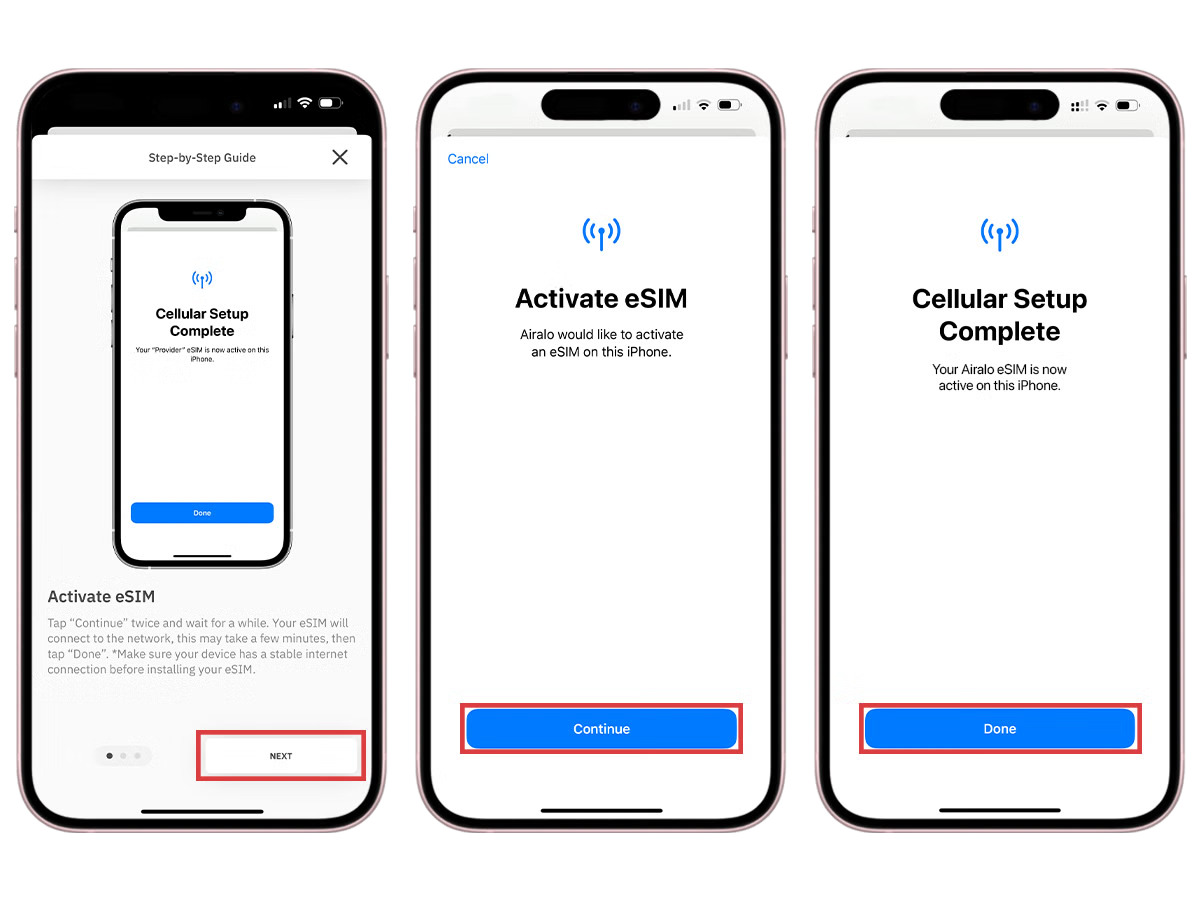
4. Install & activate your eSIM
Most eSIMs will activate when you turn on your eSIM line and connect to a supported network at your destination.
(Please be careful some eSIMs will activate immediately upon installation. )
The best time to activate your device is at your destination, where there is Wi-Fi, such as an airport or hotel.
Day 1 of the usage period begins the moment you activate your eSIM.
*Please install & activate before departure only if you have sufficient time in your contract period.
■ Install your eSIM
Once you’ve purchased your eSIM, you’ll need to install it on your device.
Before starting the installation process, ensure you have a stable Wi-Fi connection.
Here are three different methods to install an Airalo eSIM:
- Direct: Go to the Airalo app and follow the step-by-step prompts to install your eSIM.
- QR Code: Scan a QR code to start the installation process.
- Manual: Enter your eSIM details manually in your device’s Settings section.
For more details on how to install your eSIM, follow the steps outlined in these links:
- iOS/iPhone eSIM guide
- Android eSIM guide
- Samsung Galaxy S20/S21 eSIM guide
- Google Pixel eSIM guide
- Huawei eSIM guide
As you follow the installation steps, you’ll be prompted to label your eSIM.
For example, if you’re visiting Malaysia, you can label your line as “Malaysia eSIM” to distinguish between your main SIM and your eSIM.
It makes life a lot easier – especially when using your SIM card for calls and texts, and your eSIM for data.
Note!!
🚫Do not remove the eSIM from your device.
Most eSIMs can only be installed once.
If you interrupt or delete the installation midway, you will not be able to reinstall it, so please install it in a stable internet environment.
There is no basic fee, so you can leave it as it is after you return home.
Even if your eSIM expires after you return to your home country, you can continue to use it by recharging it the next time you travel to the same country.
(However, if a certain number of days have passed since the expiration date and you are no longer able to recharge your eSIM, please delete the eSIM from your smartphone and purchase a new one.)
■ Activate your eSIM
Turn on the eSIM line, connect to the local network, and activate it.
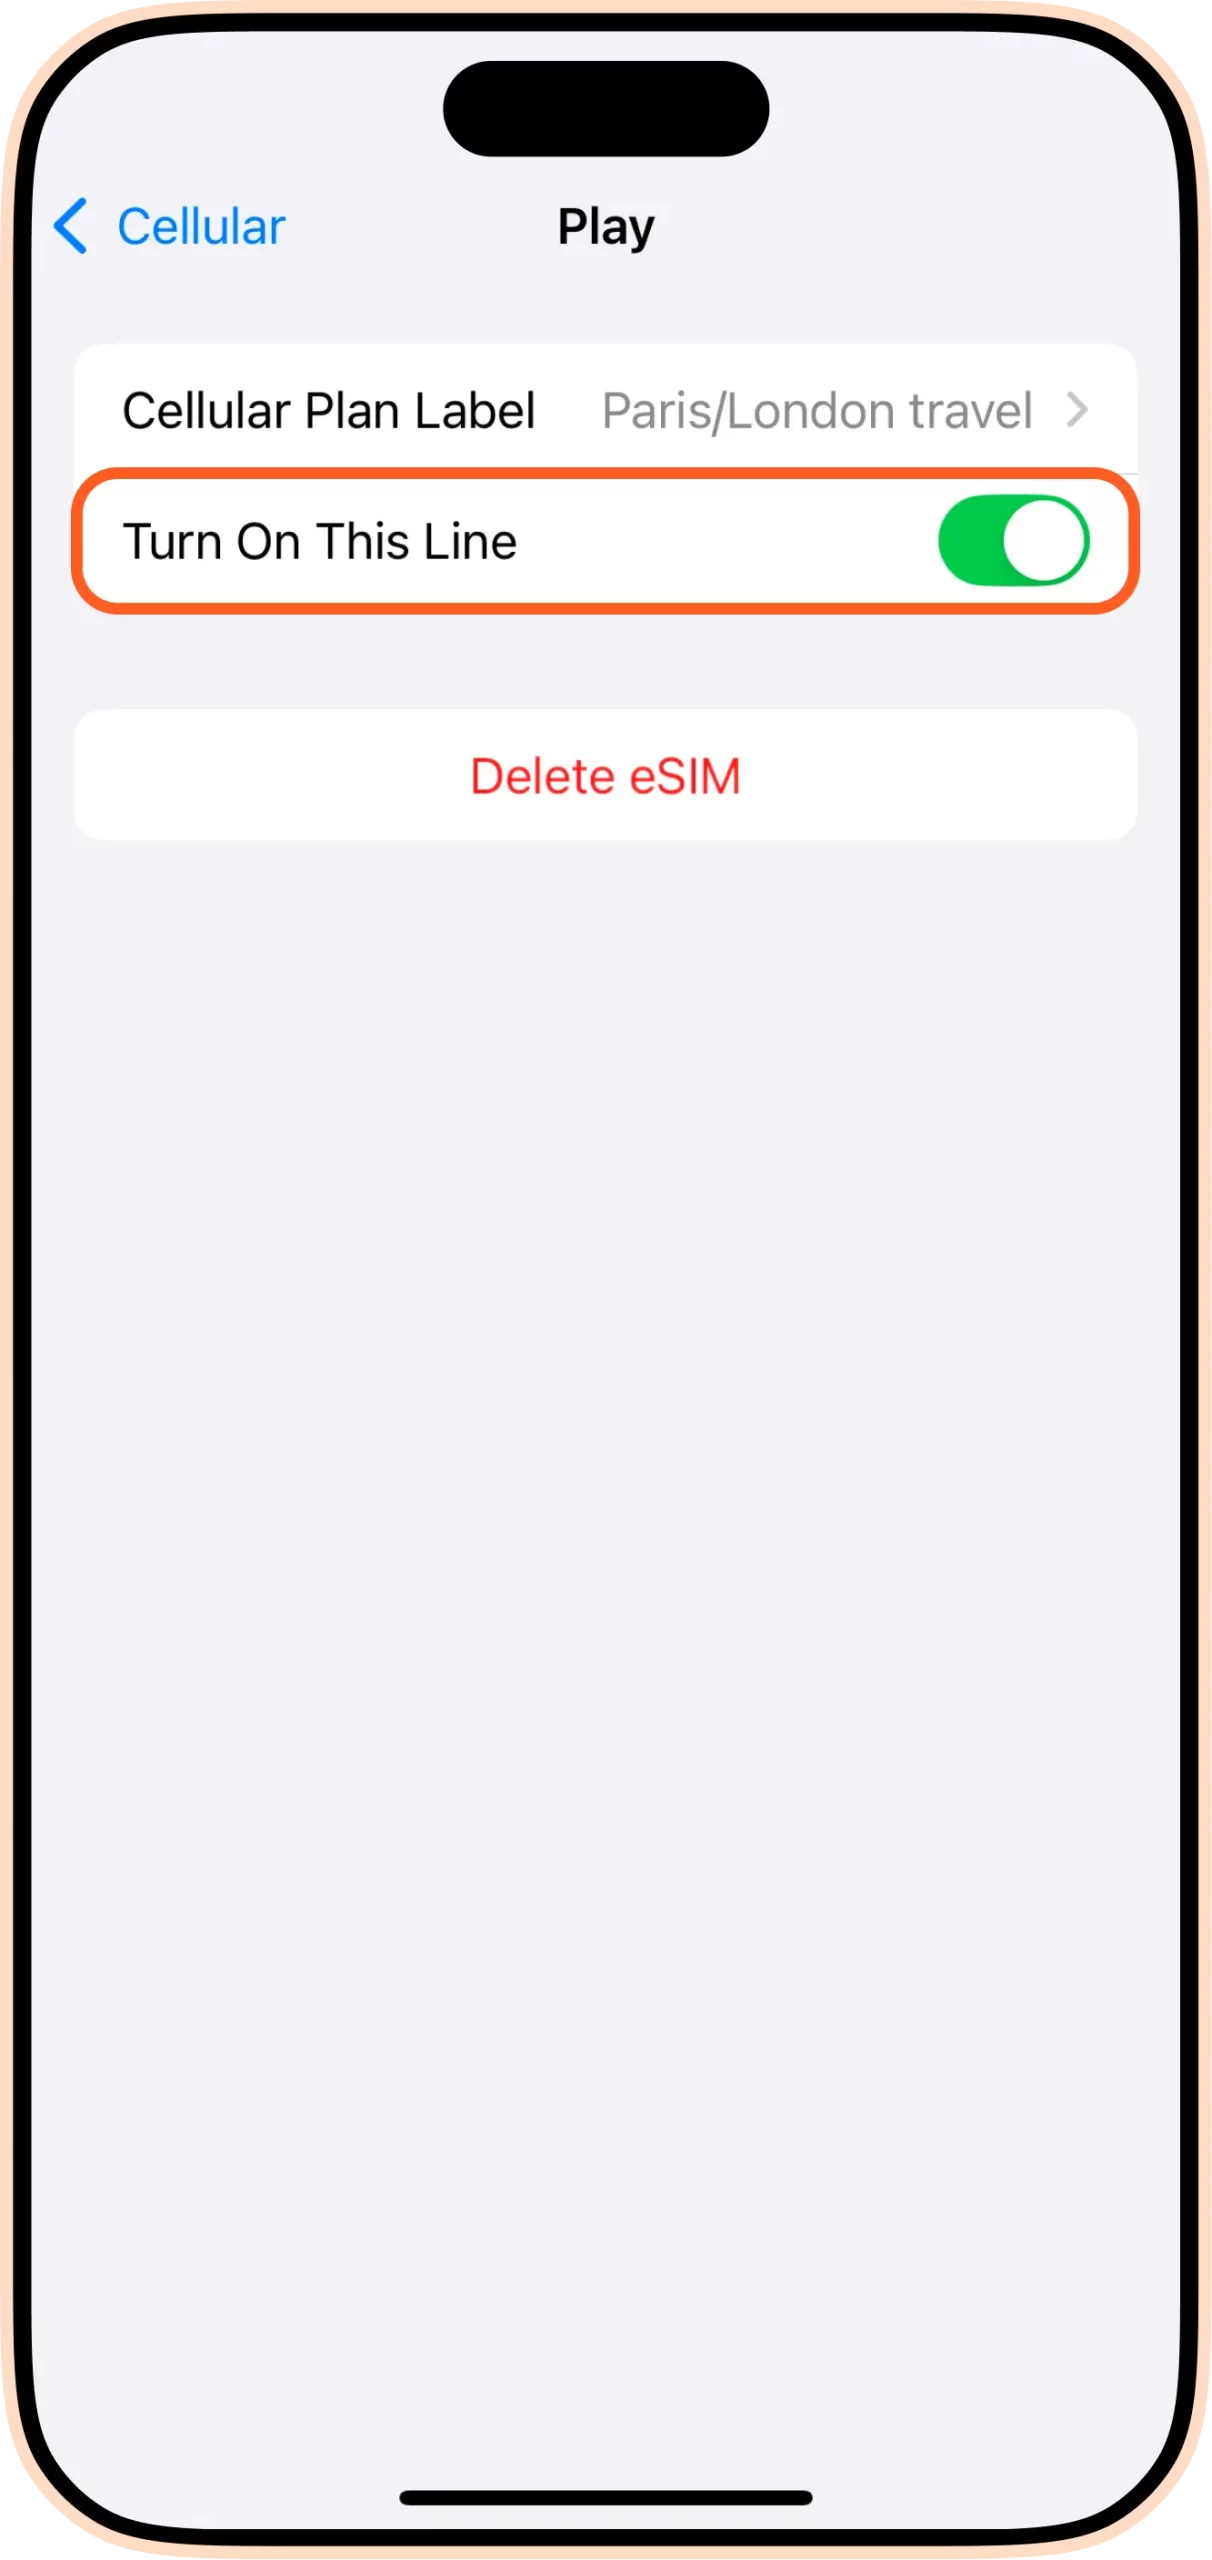
how to turn on your eSIM line on iPhone:
- Go to Settings.
- Tap Cellular.
- Tap your eSIM line.
- Toggle on Turn On This Line.
- Toggle on Data Roaming.
- Tap Network Selection and select a supported network (you can find a list of networks in the eSIM’s Additional Information section).
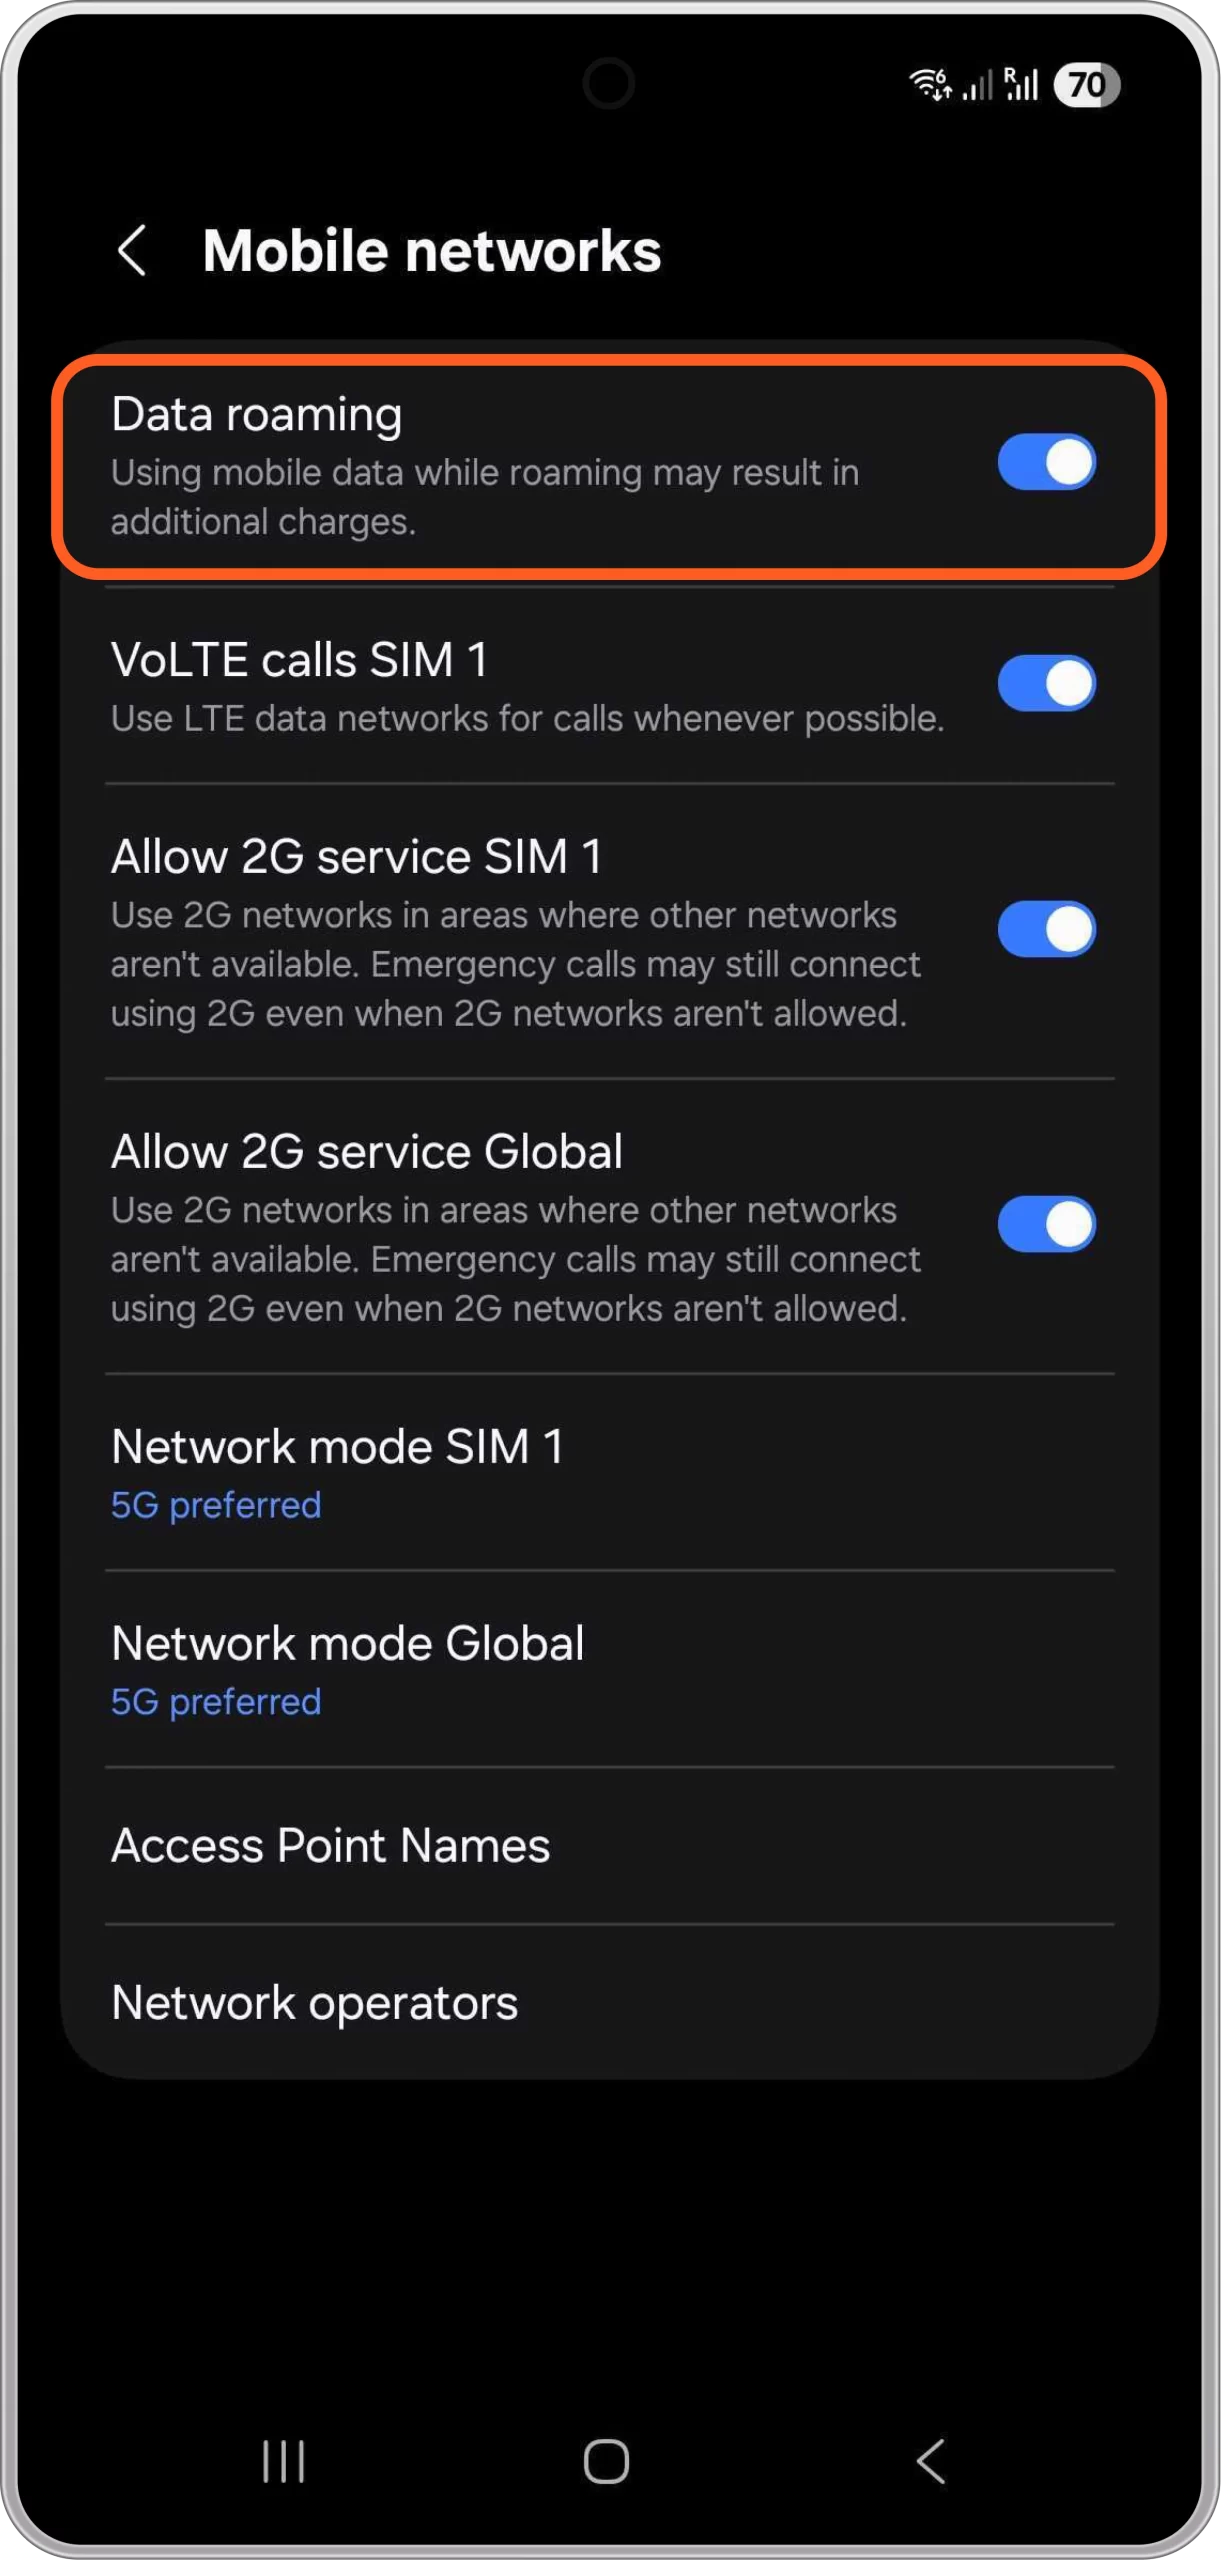
how to do it on Android:
- Go to Settings.
- Tap Network & Internet.
- Tap Mobile Network.
- Turn on your eSIM.
- Turn on Mobile Data.
- Turn on Data Roaming.
- Select a supported network (you can find this in the eSIM’s Additional Information section).
5. Setting for using the main line and eSIM separately
There’s no point in buying an eSIM unless you set it up so that emergency phone calls from your home country are made via the main line as before, and WhatsApp and internet searches are made via the data line.
■ Settings on iPhone
Cellular Data
- Tap “Cellular" and then tap “Cellular Data".
- Switch “Cellular data" from your “primary" line to an eSIM(airalo).
- Turn off “Allow cellular data switching".
Default Voice Line
- Leave the “Default voice line" as your “primary" line.
(Don’t switch to eSIM)
⬇
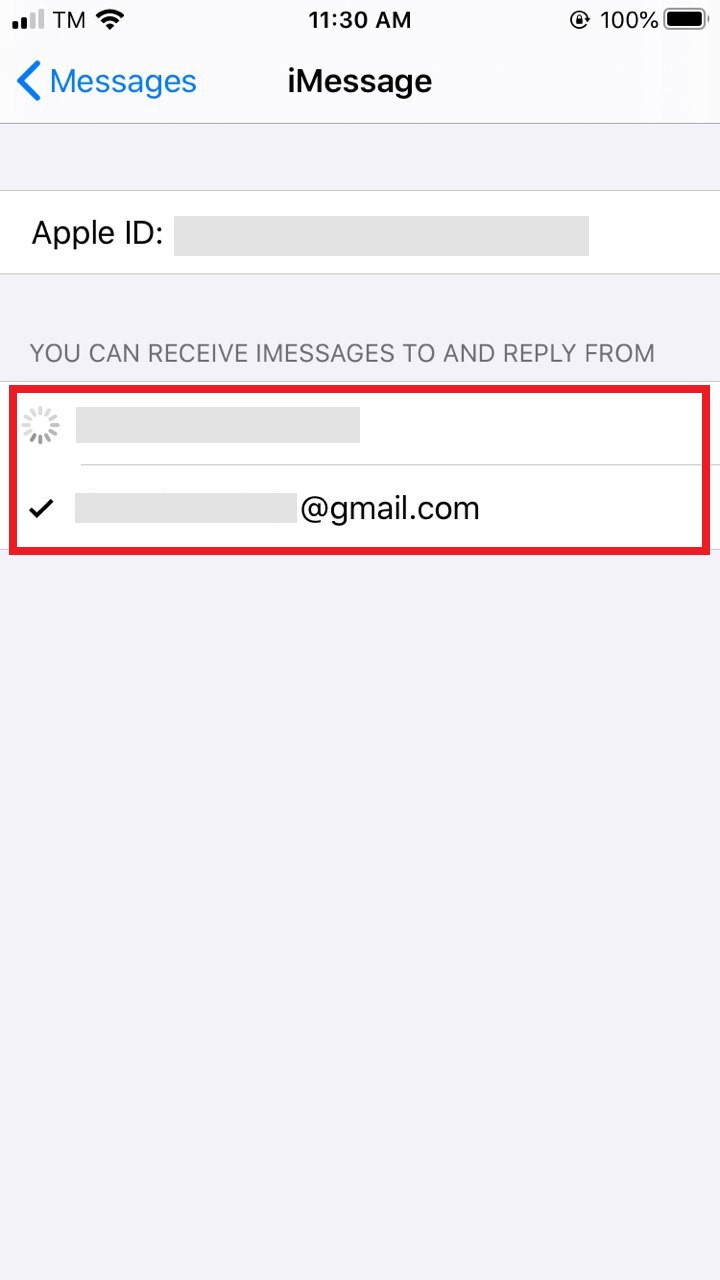
iMessage and FaceTime Settings
Please keep in mind that you may need to reset iMessage after installing your eSIM. You can do so by following the steps below:
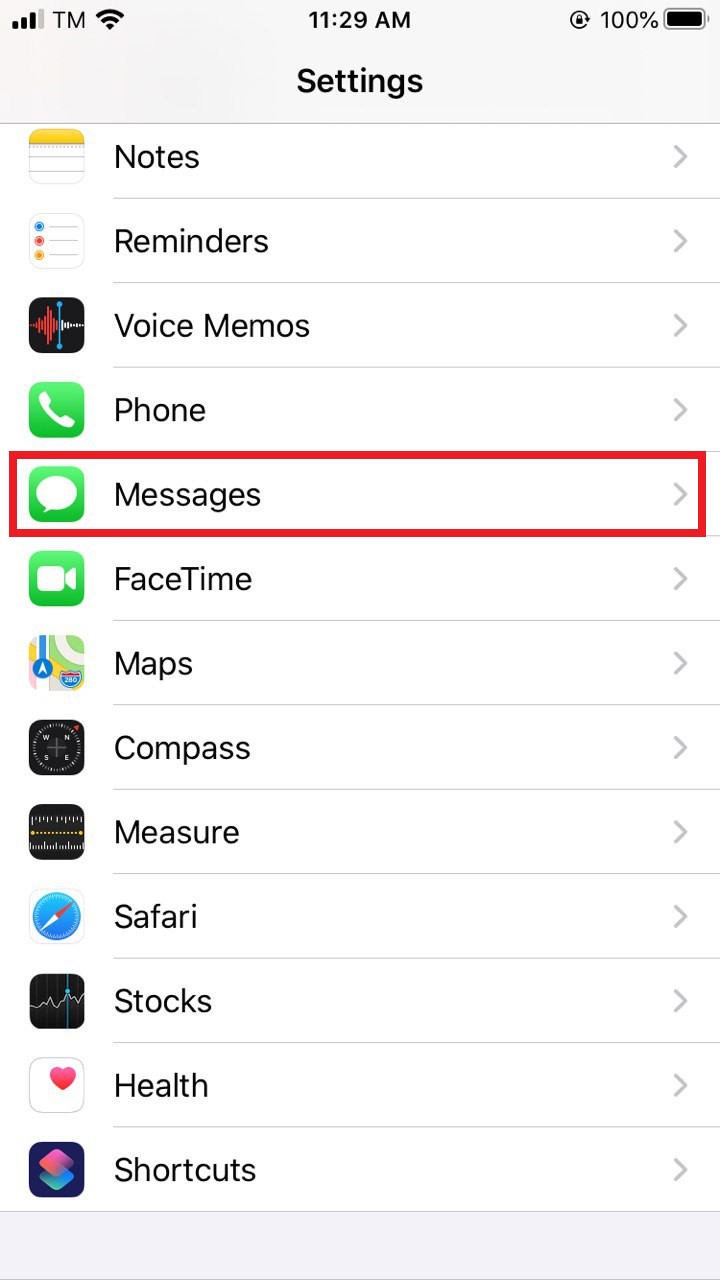
- Go to Settings on your device
- Go to Messages
- Toggle iMessage OFF
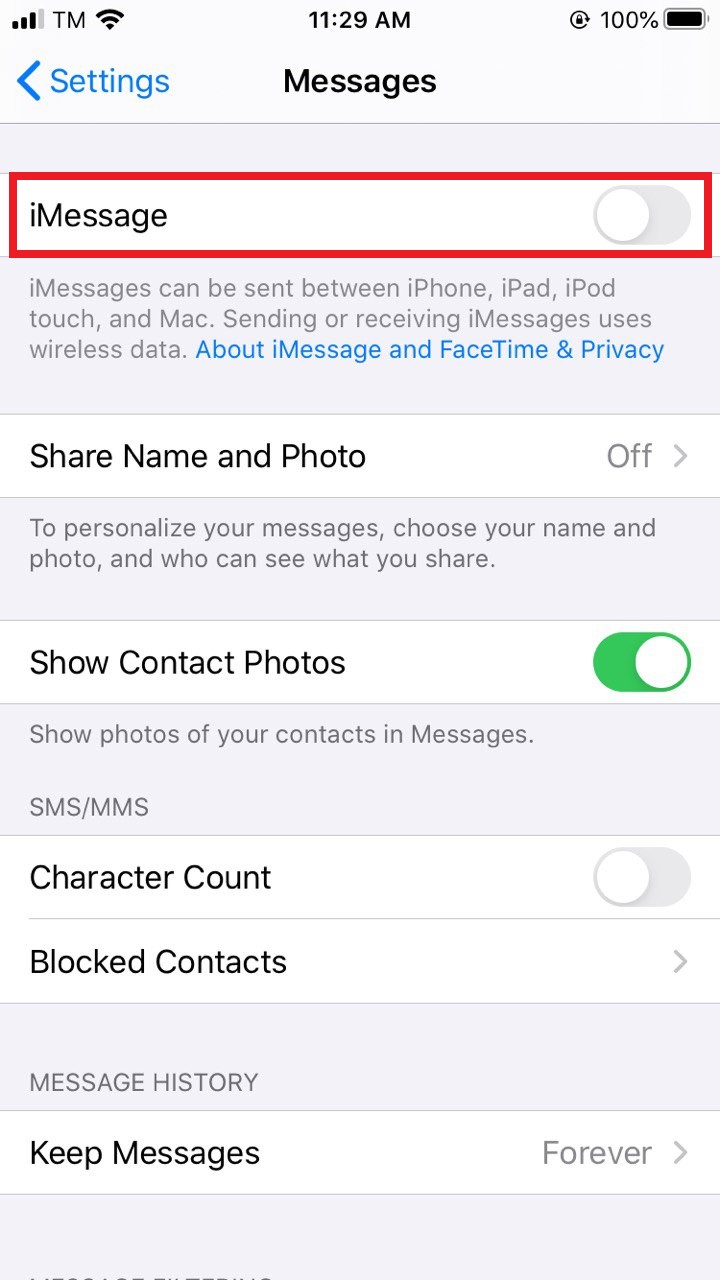
- Toggle iMessage back to ON
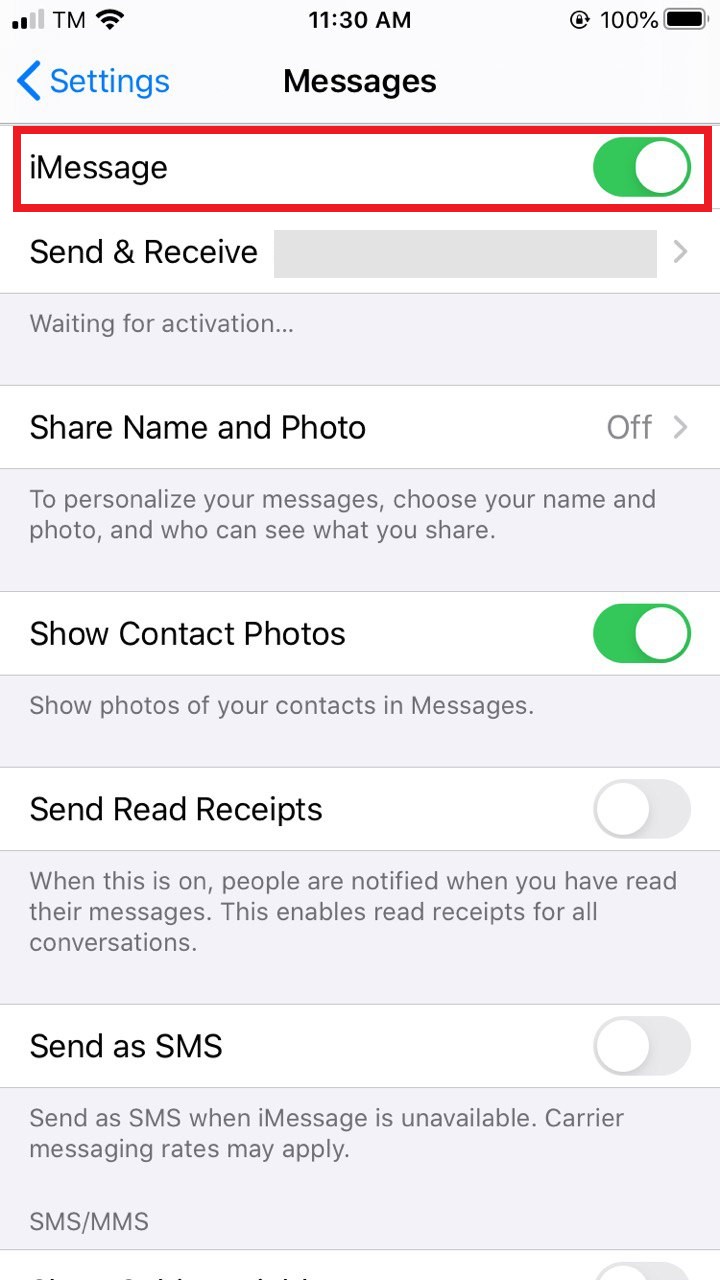
- Tap on Send & Receive
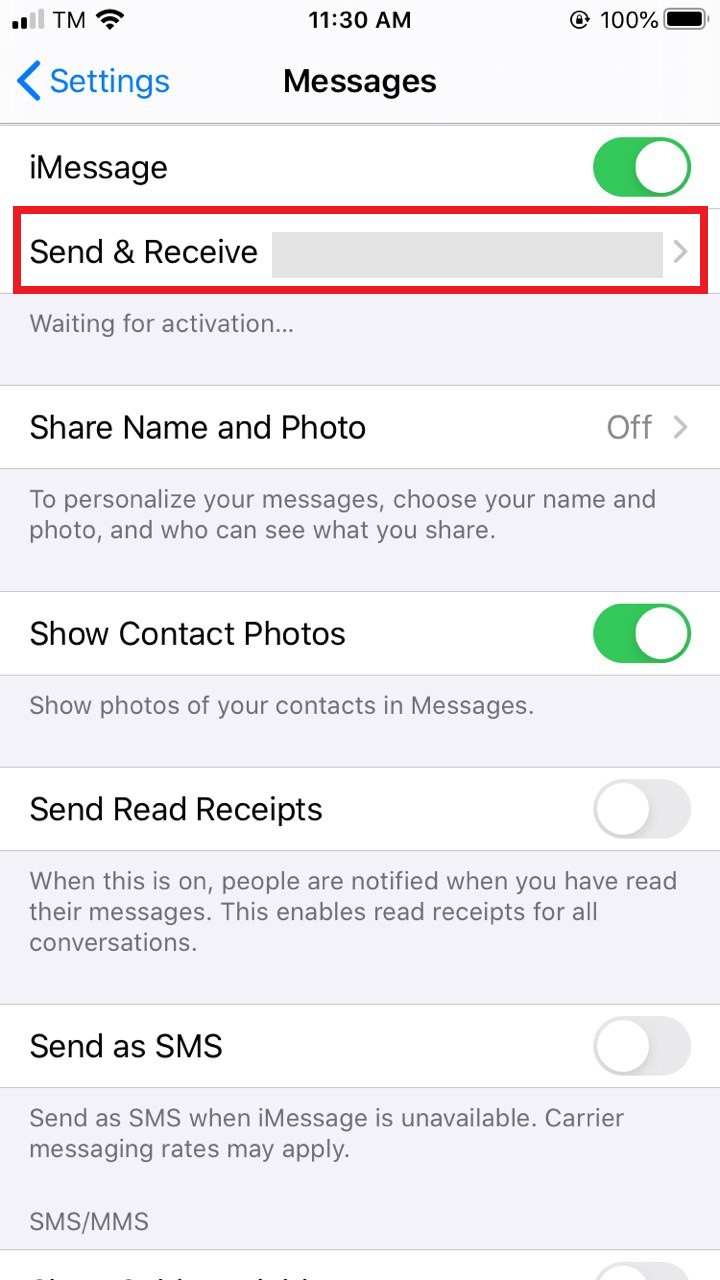
- Uncheck your number and make sure your email address is checked.
This way, you’ll be able to send and receive iMessages with only a data connection.
Don’t forget that you may need to reset your imessage after returning to your home country.
When you no longer have a need for your eSIM, and wish to switch back to your Primary SIM, you can do so by following these steps: Settings > Messages > Send & Receive and check your phone number again.
Since I didn’t have this setting, I received notifications like “iMessage and FaceTime are not turned on" on my phone screen many times while I was in Malaysia, but I don’t use them much so I ignored them thinking “What’s this about?"
I was still able to use iMessage after returning to my home country, but this time I was frequently receiving messages like “FaceTime not activated," so I checked the settings and found myself torn between selecting “Main Line" or “Expired eSIM".
iPhone Settings screen → Cellular → Select “eSIM" from SIM → Turn off this line by selecting “Turn off this line", then reconfigure FaceTime → activate FaceTime.
🚫If you plan to return to Malaysia in a short period of time, please be careful not to delete your eSIM.
6. My impressions after using airalo
This trip was for 10 days, and by just paying a low fee, I didn’t have to check for Wi-Fi when I was outdoors.
I was able to use the navigation function of Google Maps, my own location information, messaging apps like WhatsApp, and so on, just as I normally would, stress-free, which was great.
There were no problems with voice calls using WhatsApp and other services, but when it came to video calls with people back home, the image from the other party was choppy and would occasionally stop (although this probably depends on the local carrier’s internet speed), so I tried to use Wi-Fi at hotels or local friends’ houses whenever possible for video calls from my side.
Watching videos and updating apps use a lot of data, so be sure to check your remaining data.